Linux
/TGMotion directory
All the files necessary for the TG Motion system are located in the /TGMotion directory. The structure is as follows:
/TGMotion/app/cnc– CNC module libraries (libSF_xxx.so) and CNC tester programQt_CNC_Tester_5/TGMotion/bin– used for user Virtual PLC programs/TGMotion/rtss– used for user Virtual PLC programs (tgm501-xeno) and its configurationTgMotion5xx.ini/TGMotion/system– TG Motion administration utilities for start, stop, reset. The service managertgm_scruns the TG Motion service program (tgm_starter_service,tgm_xeno_service) from command line. There is also a GUI program calledtgm_control_panel. The system librarieslibTGM_Comm_Int_5.soandlibTGM_OPC_Server_5.soare located here. They are registered byldconfig, so it could be used anywhere from TGMmini’s file system./TGMotion/tools/TGM_5xx/4034_905– more utilities, e.g. console for displaying messages from TG Motion (TGM5xxDebugConsole), OPC UA server, ModbusTCP server and DNC emulation through serial port./TGMotion/Windows– contains useful Windows utilities for working with TGMmini. Included is e.g.Control Observer, CNC module libraries and the example CNC programQt_CNC_Tester_5.exe.
TG Motion administration
The stand-alone program called tgm_control_panel is used for TG Motion management.
Also the Virtual PLC can be started manually from here.
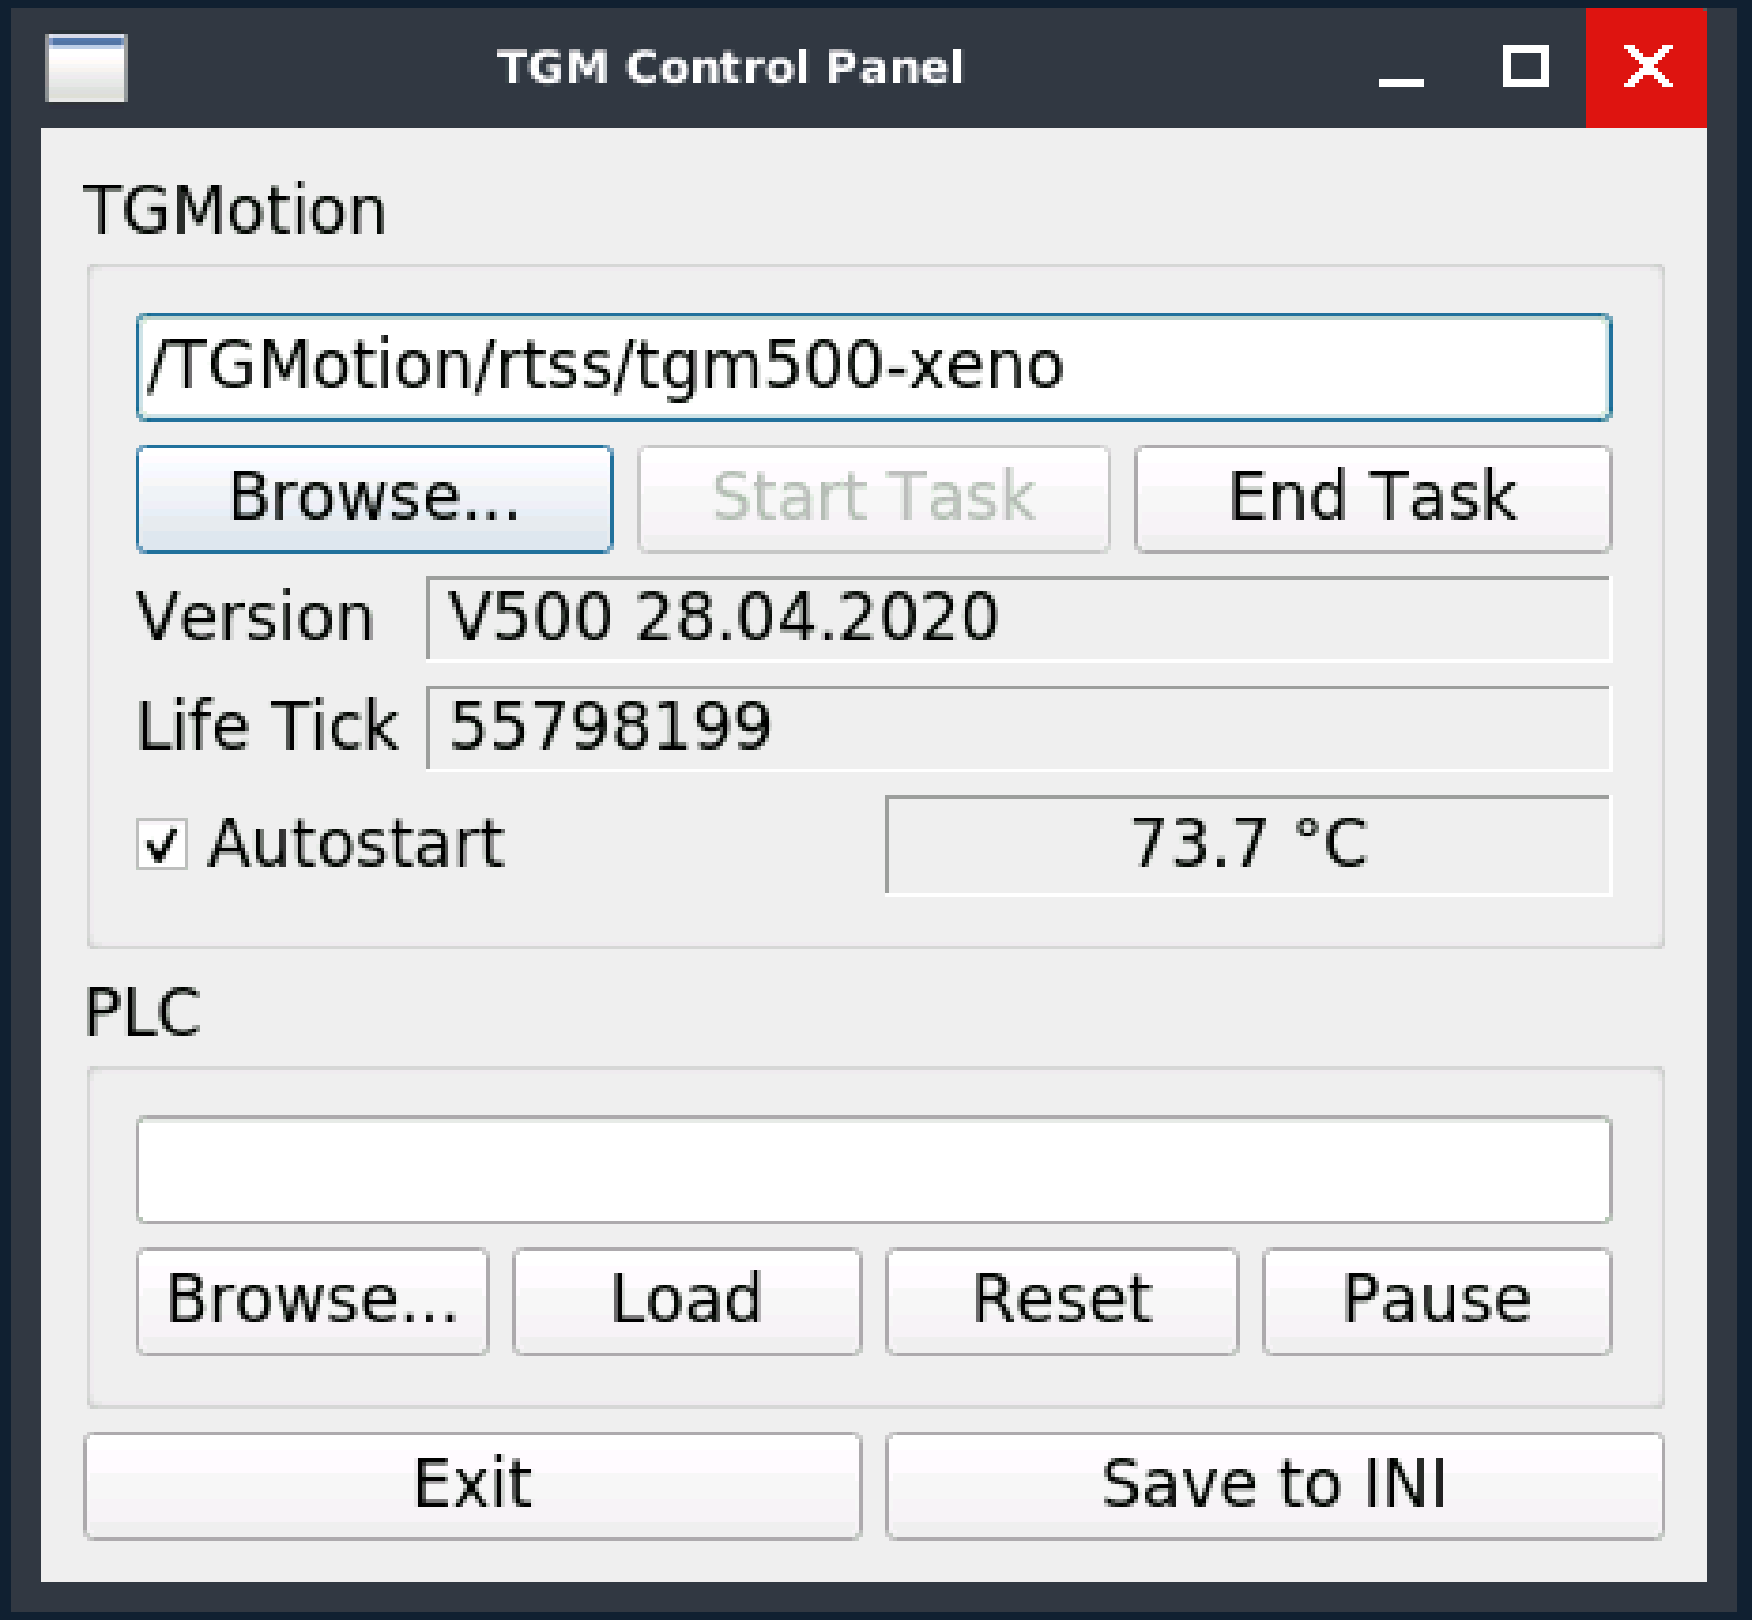
The button Save to INI saves the actual settings to the tgm_starter_service.ini file.
Saved are the path to the TG Motion binary and state of the Autostart check box.
The path to the Virtual PLC is not saved.
It is necessary to set it in the TgMotion5xx.ini file directly, e.g. by using the Mousepad editor:
The remote control of the TG Motion system is enabled by default.
It can be changed in the /TGMotion/system/tgm_xeno_service.ini file by
A restart of TGMmini is necessary.
Start of Virtual PLC program
Virtual PLC is controlled in the same way as on the PC.
First, the complete path name to PLC executable binary file must be written to the SYSTEM.Main.PLC_Name register.
Filename is always in UNICODE (UTF-16) format, maximum path length is 512 characters (including the null terminator).
Then the PLC can be easily started or stopped by setting the control bits in the SYSTEM.Main.PLC_Ctrl register.
For detailed description see the TG Motion operation manual.
If the remote server is running (the default option), the PLC can be controlled from PC by utility program Control Observer.
The PLC filename must be entered as local TGMmini filename, e.g. /TGMotion/bin/Universal_PLC.so.
For more information please see the Control Observer manual.
Connection to shared memory
All the shared memory access for controlling the TG Motion is done by library TGM_Comm_Int_5.
The standard file name and location is /TGMotion/system/libTGM_Comm_Int_5.so.
All the TGMotion utilities and example programs use this library.
Its complete description and usage of this library is written in a separate manual.
Shared memory remote access from PC
If the server for remote control is running (see above), the shared memory can be accessed remotely from PC.
The Windows DLL file TGM_Comm_Int_5.DLL file together with its plugin TGM_Mini_5.DLL is used for this purpose.
Also the Control Observer utility program can be easily used for all the operations with shared memories on TGMmini.
It is necessary just to know the IP address of the TGMmini on the local network.
File transfer
Since the TGMmini is complete Linux computer, it is very easy to transfer files from/to PC. The SCP protocol is used. Suitable Windows client is e.g. user-friendly program called WinSCP www.winscp.net. For successful connection the IP address, username and password are needed. It is recommended not to use the superuser (root) for file transfers.
Complete remote control of the TGMmini
The TGMmini control system can be run in headless mode, i.e. without monitor, keyboard and/or mouse. Then it is possible to control the TGMmini by using VNC protocol. The VNC server is already setup and running on the TGMmini. Recommended Windows VNC Viewer and settings can be found at www.realvnc.com.
Transfer files by USB flash disks
TGMmini has four USB ports and of course the USB disks can be used.
The disk must be formatted with FAT32 file system.
The File Manager on the TGMmini desktop displays automatically the content of the USB disk after plug-in.
It is recommended to disconnect the USB disk before unplug (this operation is called unmount in Linux operating system).
Right mouse click on the USB icon and selecting Unmount command from menu can do this.
There is also unmount icon in the notification area of the desktop.
The behavior is controlled by file /etc/fstab.
USB disk appears in the Linux system as /dev/sda with its partition as /dev/sda1.
The possible settings in the fstab file could be:
The Xfce4 desktop also has a very handy plugin for managing USB disks xfce4-mount-plugin, which can be installed by
Other TGMmini settings
IP address
One of the most important TGMmini parameter is its IP address on the local network.
It is recommended to use static IP address for easy and permanent access.
The default TGMmini IP address is 192.168.1.220.
The IP address can be changed in the file /etc/network/interfaces.d/eth0.
Access to this file is allowed only with root privileges, e.g. by terminal command:
or
depending on your preferred text editor.Internet access
TGMmini can access internet.
It is necessary to correctly set up name server IP address in the /etc/resolv.conf file, again with root privileges.
When the internet connection is active, the Debian distribution can be updated by using the commands
MAC address
TGMmini reads a unique number from its processor and creates an Ethernet MAC address from this number. If it is necessary to change the MAC address, it can be done manually from command line. All the six values of the MAC address must be written one by one by command
where offset is0x01, 0x02, …, 0x06 and the number after the value changes accordingly to wanted MAC address.
In the case of error or need to revert to the default MAC address it is necessary to write 0xff to all the offsets 0x01 … 0x06.
The default MAC address is written on the label of the TGMmini’s case.
Screen saver, monitor energy saving
In its default settings, the screen saver and monitor energy saving is switched off.
It is performed by script /home/shareman/autostart.sh which is called automatically during desktop initialization.
Settings is done by the xset program.
The list of all its possible settings can be displayed by invoking xset in the command line.
Application autostart
Any application can be auto started during Xfce4 desktop initialization.
Use the dialog panel Start|Settings|Session and startup for that purpose.
The following servers for TGMmini remote control are already prepared in this dialog: OPC UA, ModbusTCP, serial port DNC emulation.
It is recommended to use (i.e. enable autostart) only one of these servers.
Screen resolution
TGMmini supports the following screen resolution:
| Rozlišení | Obnovovací frekvence |
|---|---|
| 800 × 600 | 60 Hz |
| 1024 × 600 | 75 Hz |
| 1024 × 768 | 60 Hz |
| 1280 × 720 | 60 Hz |
| 1280 × 800 | 60 Hz |
| 1280 × 1024 | 60 Hz |
| 1368 × 768 | 60 Hz |
| 1400 × 1050 | 60 Hz |
| 1440 × 900 | 60 Hz |
| 1600 × 900 | 60 Hz |
| 1600 × 1200 | 50 Hz |
| 1680 × 1050 | 50 Hz |
| 1920 × 1080 | 47 Hz |
The color bit depth is always 16 bits per pixel (RGB565).
The screen resolution can be set by program called screen_resolution, which can be invoked from menu item Start|Settings|Set Screen Resolution.
Resolutions from 1400 × 1050 and higher uses reduced interval timing CVT-RB and are designed for higher quality displays. The full HD resolution 1920 × 1080 works only with several monitors. It is necessary to test the right combination of a resolution and a display.
The resolution can be changed in console as well. Log in as root and go to the directory /root. There are several scripts available for setting the resolution. After running the script a reboot is necessary. The used terminal connection can be either USB or by SSH protocol, see below in TGMmini administration.
Hardware mouse cursor
GMmini supports hardware mouse cursor from firmware V2.2 upwards. The pointer is inserted directly to video stream data by hardware. This feature reduces the CPU load and eliminates cursor flickering. The standard mouse cursor size is 16 × 16 pixels, maximal size is 32 × 32. The Xfce desktop environment supports pointer size up to 48 × 48 pixels, in that case the software (by CPU) draw is automatically selected.
The mouse cursor type and behavior is controlled by /usr/share/X11/xorg.conf.d/99-fbdev.conf file.
The standard options are
Option "HWCursor" "true"
Option "GlobalHWCursorDisable" "false"
Option "InverseHWCursorColors" "false"
Changing "HWCursor" to "false" switches to software drawn cursor.
Setting "HWCursor" "true" and "GlobalHWCursorDisable" "true" completely disable the mouse pointer which could be useful in kiosk mode.
Finally the "InverseHWCursorColors" "true" option swaps the black and white color for monochromatic cursor visual types.
Both color ARGB and monochromatic cursor files are supported.
User defined mouse themes can be found on the internet and should be copied to the ~/.icons/<theme name>/cursors directory.
The actual theme can be set by menu item Start|Settings|Mouse and Touchpad, tab Themes.
Visual styles
TGMmini is delivered with its own visual style which is suitable for touchscreens.
The visual style is called TG_Flat.
Other available visual styles can be used by desktop menu command Start|Settings|Window Manager.
Touchscreen calibration
The touchscreen can be calibrated by Start|Calibration|Calibrate touchscreen command.
After successful calibration the data are just displayed in the terminal windows.
It is necessary to copy and paste them to the calibration file.
Another menu command Start|Calibration|Edit calibration data can be used for opening the file and replacing the old calibration data with the new one.
TGMmini administration
A USB cable (connected to micro USB service connector) can be used to connect the TGMmini with a PC – it appears as a serial port console. By using a suitable terminal program (putty, TeraTerm) all the shell commands can be invoked. Also the SSH protocol is enabled, so the Ethernet connection can be used to establish a terminal control.
Status LED (STS) description
- Shortly after switching on the TGMmini, the red LED will light up.
- When the Linux operating system is started, the green LED will flash and the red LED will go off.
- The TGMotion control system is then started and the green LED is permanently lit.
- If the internal I/O module is activated, i.e. the inputs and outputs on connectors X5 and X10 are used, the red LED is used to indicate the status of the outputs:
- if the output circuit is in error (i.e., bad power supply, overvoltage or short circuit on the outputs, etc.), the green and red LEDs flash alternately,
- otherwise (i.e. the output circuit is OK), the green LED is steady.
- After the operating system shutdown process is started, the red LED lights up. It is permanently lit until the TGMmini power is disconnected.
| Indicator | Description |
|---|---|
| Red light | Start or shutdown of Linux operating system |
| Green blinks | Linux is started, TG Motion is not running |
| Green light | TG Motion runs without problems |
| Red and green blink alternately | TG Motion runs, internal output module is in error state |
This behavior can be disabled by
in the/TGMotion/system/tgm_xeno_service.ini file.
Then only the red LED lights during the startup. All the subsequent LED control must be done by a separate program. Shell commands used could be:
/usr/local/sbin/i2cset 1 0x28 0xF6 0xC # (1)
/usr/local/sbin/i2cset 1 0x28 0xF7 0x50 # (2)
/usr/local/sbin/i2cset 1 0x28 0xF4 0x4 # (3)
/usr/local/sbin/i2cset 1 0x28 0xF4 0x8 # (4)
/usr/local/sbin/i2cset 1 0x28 0xF4 0x0 # (5)
- pins
SS2andSS3as GPIO - GPIO as push-pull
- Lighting of the red LED

- Green LED

- Lighting both LEDs

It is necessary to install I2C-tools, i2c-tools-4.1.tar.gz.
Separate LED control outside TGMotion is required for some special user programs, such as the Profinet I/O device.